
Learn how to make beeswax wrap with your favorite cotton fabrics. This DIY beeswax wrap makes for practical, reusable, and sustainable food storage.
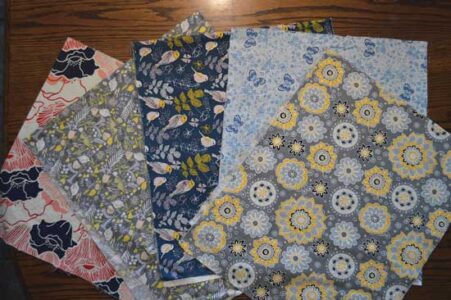
A collection of fabric spanning the color spectrum cluttered my mother’s kitchen table. I scanned the lively array of birds, flowers, and geometric shapes until two patterns caught my eye: A cut of violet fabric with birds and a pale-yellow floral design.
“These are great,” I said, setting the material aside. “My vote is for these two.”
I’d arrived at the house earlier that morning so my mother, Belinda, and I could tackle making our own beeswax wraps, a sustainable food storage option that replaces plastic and can be used to cover leftovers in bowls, hold blocks of cheese, store a handful of snacks, and more.
The genius behind reusable wraps lies in their simplicity. They’re comprised of a mixture of beeswax, jojoba oil, and tree resin that, when soaked into 100-percent cotton fabric, creates a sticky material that can cling to itself or other objects. The beeswax and jojoba oil have antibacterial properties, making it a favorable combination for food storage. The jojoba oil also prevents the resin and wax from cracking and peeling off by keeping it soft. When warmed by hands, the fabric clings better than plastic wrap or aluminum foil.
With a little bit of time, and some trial and error, we crafted a collection of simple and sustainable wraps — and you can, too!
How to Make Beeswax Wrap
As my mother began cutting each square of material to the desired length and setting them aside, I firmly held a one-pound block of pure beeswax in one hand, sliding it across a grater into a bowl. With the effort it took, I plan to use pellets for my next beeswax craft, which should be quicker and easier. I then placed a few tablespoons of the grated wax into a saucepan and slowly heated it on the stove, along with a few splashes of jojoba oil and powdered pine resin. I chose pine because many people, both at home and commercially, use this type, and the powder dissolves quickly with the rest of the mixture.
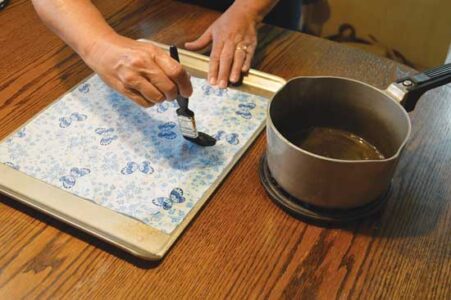
When all of the ingredients were ready, we laid the first piece of material, a 12-by-12-inch square that’s the perfect size for wrapping a sandwich, on a sheet pan, which would later go into a preheated oven. Then, we dipped our paintbrushes in the mixture and began lathering the material.

“It’s not sliding on very well,” my mom said. I agreed, noticing that my brush didn’t paint the mixture as evenly as I’d expected.
We’d taken the pan off the stove, moving it near the table so I could take photos of our process. However, in doing so, the mixture had started to harden quickly. So, we moved it back onto the burner, putting the heat on low, and that did the trick; the mixture saturated into the fabric better, though it was still a bit sticky.
We then “baked” the material in the oven for a few minutes, took it out, and began spreading the mixture across the fabric again. Our brushes had started to harden, making the process even more challenging than just minutes before. We found that pressing the brushes against the hot saucepan kept the bristles pliable enough to lather on a bit more of the mixture.
“It doesn’t seem to have soaked all the way through in some spots,” Mom said, holding the first wrap in her hands, just by the tips of two corners.
We decided it’d be best to add more of the mixture to this first one. Afterward, I stuck it back in the oven for five more minutes, and after removing it, we smoothed the mixture out again. This time, we’d done it.
Why Make Reusable Food Wraps?
As we continued making our food wraps, I thought back to when I first began using beeswax wraps I’d purchased from Bee’s Wrap. Much of my waste had been plastic storage bags I used to tote food to work or on weekend hiking trips, as well as plastic wrap used to cover leftovers. I realized this was simply unnecessary. Once I began using beeswax wraps, though, I used far less plastic.
Although we’d still purchased the ingredients to make our wraps, which required some use of resources, we were doing our part to help reduce the amount of plastic in the world. Every year, more than 300 million tons of plastic are produced, and half of it is single-use, according to Plastic Oceans, an environmental nonprofit.

(CC BY-NC-ND 2.0)
Not only are reusable beeswax wraps better for the environment, they’re also better for our health, because using organic wraps reduces our food’s contact with plastic that’s laden with potent chemicals. As a bonus, most wraps can be used for about a year before it’s time to replace them, saving us money. Instead of throwing them away, compost them or use them as effective fire starters.
In about three hours, we’d made 15 wraps of varying sizes. Still, we had enough ingredients to make at least 15 more. Fortunately, the whole process wasn’t as messy as we’d expected, and we produced enough sustainable food storage wraps to last us a year, reducing our need for plastic in the kitchen.
DIY Beeswax Wrap
From our home DIY experiments to yours, we’re happy to present you with a tried-and-true recipe to make simple and sustainable storage for your delicious food.
Yield: Three 12-by-12-inch wraps.
Supplies
- 100-percent cotton fabric
- Straight edge scissors
- Small saucepan
- 5 tablespoons pure beeswax (pellets or grated)
- 4-1/2 teaspoons jojoba oil
- 3-1/2 tablespoons pine resin powder
- Wide ice pop stick
- Baking pan
- Paintbrush
- Clothespins
- Wire hanger
How to Make Beeswax Wrap
- Wash the fabric in fragrance-free, all-natural detergent to ensure it doesn’t pick up any chemical smells. Then, hang to dry or toss in a dryer.
![]()
- Use a straight edge to create a uniform square from the fabric, measuring 12-by-12 inches. Cut cleanly along the lines with scissors. Cut off any stray pieces of thread.
![]()
- Preheat the oven to 200 degrees Fahrenheit.
- Place a saucepan on the stove over medium-low heat. Pour in beeswax, jojoba oil, and pine resin.
- Use an ice pop stick to stir the contents until it melts into a thick liquid. After melting, keep the stove on low heat to ensure the mixture doesn’t harden. If it does harden, simply turn up the heat and stir again.
![]()
- Place the fabric on a metal pan large enough to fit your fabric pieces. With a paintbrush, liberally apply the mixture onto the fabric until it’s saturated — it’ll be sticky and blotchy, but will even out in the oven. Don’t worry about coating the underside, as the mixture will soak through the fabric.
![]()
- Once the fabric is well covered with the mixture, put the pan in the oven for 5 minutes.
- Take the pan out of the oven, and use the paintbrush to evenly spread the mixture across the fabric, ensuring it’s soaked through. If the fabric needs more of the mixture, add some, and then repeat Steps 7 and 8.
- Hang the fabric using clothespins and a wire hanger. Let cool for at least 15 minutes.
![]()


Note: Before making an entire batch, ensure your mixture ratio is correct and that you’ve applied the right amount of it to your fabric. Once the first wrap has dried, test it by sticking the fabric to itself and then pulling it apart. If it sticks and makes a “click” as it comes apart without much force, your ratio is spot on. If the fabric doesn’t stick well and doesn’t produce the “click,” try adding more of the mixture to the fabric. If that doesn’t work, the ratio may need more resin. On the other hand, if it’s difficult to remove the fabric from itself, you’ve likely applied too much of the mixture to the fabric.
How Big to Make DIY Beeswax Wraps
A nice wrap collection includes small (8-by-9-inch), medium (11-by-10-inch), and large (12-by-13-inch) ones. The small size is perfect for half-cut onions, nuts, or placing over the mouth of canning jars. For nuts, ball them up and crunch the top of the wrap, wrapping it in a rubber band to prevent it from unraveling. For cheese, I like the medium size, which can also cover bowls of leftovers. The large size covers baking pans nicely. Just be sure that any baked goods have completely cooled before covering them as, again, the mixture will melt with any heat. For a loaf of bread, try 18-by-24 inches, and for baguettes, use a 12-by-24-inch wrap. My favorite use for beeswax wraps is storing sandwiches. The ideal size is 12-by-12 inches, wrapped with twine to keep the wrap snug in your bag.
Handling & Care
Beeswax wraps are ideal for covering up cheese and bread, or half-eaten apples and slices of pie. The only thing they’re not recommended for is raw meat. Also, these wraps won’t produce a watertight seal, but neither will plastic wrap or aluminum foil. Unlike plastic, though, beeswax wraps are breathable, which allows moisture and heat to evaporate, keeping food fresh for longer periods.

Use the warmth of your hands to mold it around an object. Once it cools, the wrap holds its shape well. After a few uses, especially with pungent foods, such as onions, wash the wraps. Use cold water, as even tepid water can melt away the beeswax mixture. I use a mild, natural, scentless dish soap to lightly rub the wraps before hanging them to air dry.
Jonathan Olivier is an author and journalist from south Louisiana who writes about the outdoors and environment. For two years, he traveled across North American to work on farms before opening one of his own, Le Potager d’Acadiana.
Originally published in the September/October 2019 issue of Mother Earth Living magazine and regularly vetted for accuracy.


