Practical Projects for Self-Sufficiency (Cold Springs Press, 2014), by Chris Peterson and Philip Schmidt, shows you exactly how to build dozens of projects for a self-sufficient lifestyle, with beautiful photos and complete plans for each. Four categories–Food Prep & Preservation, Homestead, Garden and Animals–cover a broad range on popular projects, often with a creative touch or two to make them easier to build or more efficient to use.
When it’s time to get serious about composting, a multiple-bin system is the way to go. They’re designed to produce a large volume of compost in a short time. The idea is to develop a nice, big heap in one bin, then start turning it over by shoveling it into the neighboring bin, then back to the first bin, and so on. Turning greatly speeds decomposition (plus, it gives you a little exercise in the process). Depending on the compost materials, turning is recommended every 5 to 10 days. A two-bin composter lets you flip the heap back and forth between bins until the compost is ready, then you can store it one bin and use the other bin to start building the next heap.
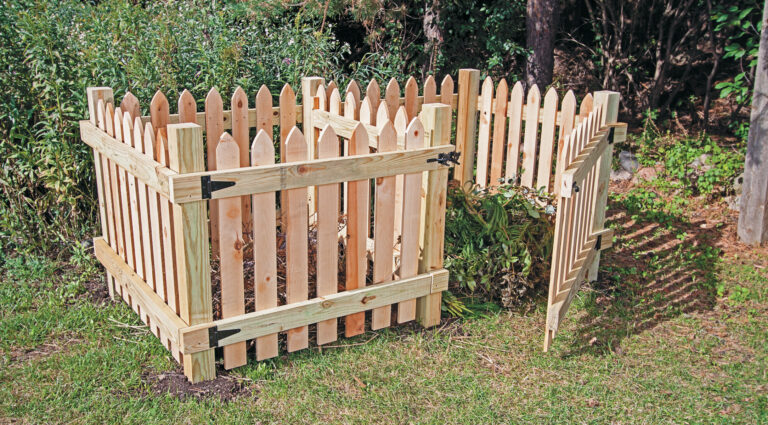
This design facilitates turning with its removable divider between the bins. Simply slide the divider up and out of the way for easy shoveling. The front sides of the bins are full-width gates, providing easy access to the bins for moving material in or out. But perhaps the best feature of this compost bin has nothing to do with production; it’s all about appearances. As much as self-sufficient homeowners and gardeners love the idea of composting, few can honestly say they like the look of a compost heap. (And the aesthetics of plastic barrels or trashcan composters need no further criticism.) You may not see a lot of bin-type composters with cedar pickets, decorative posts, and traditional gates, but what would you rather look at: a pile of rotting garbage or a well-built picket fence?
TIP: Three-peat Enough
A three-bin system uses the same idea as a two-bin composter, but the additional bin helps make the process even more continuous.
Once your heap is ready, flip it into bin two and use bins two and three for turning. This leaves bin one open for compiling the next heap. You can easily adapt this two-bin composter design to create a three-bin version.
Just extend the overall length by a third, and create another center divider and gate. The two stringers along the backside of the structure can be cut from 12-foot 2 x 4s.
Tools and Materials
• 4 ft. level
• Posthole digger
• Tamper
• Miter saw
• Cordless drill and bits
• Gravel
• Deck Screws 1-5/8-inch, 3-1/2-inch
• Exterior-grade construction adhesive
• 1/2 x 1/2-inch galvanized hardware cloth with staples (optional)
• (4) 3-1/2-inch gate hinges with screws
• (2) Gate latches with screws
• 4 x 4 post caps (optional)
Cutting List

Note: Use pressure-treated lumber rated for ground contact or all-heart cedar, redwood, or other naturally rot-resistant species.
Build the Compost Bin

1. Choose a flat, level site at least 6 x 10 feet that allows for movement in front of the bins. Cut the back rails and posts to length, then lay them out on a flat surface. Square the assembly by making sure the diagonals are equal. Fasten the rails to the posts with 3-1/2-inch deck screws.

2. Set the assembled back wall in place, then mark the hole locations with chalk or a shovel. Dig holes 8 inches in diameter by 24 inches deep at each post location.

3. Plumb and level the posts using wood braces. Fill the holes with gravel and dirt. The bottom rails should be roughly 6 to 8 inches above ground level.

4. Dig holes for the front posts, using a framing square and a side rail (or the 3-4-5 method) to locate the correct position. Put the posts in and fasten the top rail to both front and rear posts to help hold the front post plumb and level. Fill the holes with alternating layers of gravel and dirt and attach the bottom rails. Position the center post so that it’s the same distance from the corner posts and in line with both of them.

5. At the front corner posts and front center post, measure and cut six short 2 x 4s to cover the front faces of the posts (5 inches long at the corners and 3-1/2 inches at the center). These continue the runs of the stringers and will serve as mounting blocks for the gate hinges and latches. Install the blocks as you did with the rear stringers, but predrill and countersink all screw holes to avoid cracking the short pieces of wood.

6. Install the pickets along the back and sides with 1-5/8-inch deck screws. Keep the pickets 1-1/2 to 2 inches above the ground to prevent rot. The fastest way to install the pickets is to make spacer blocks. For this design, the seven pickets on the sides were spaced 1-5/8 inches apart and the back and front pickets were spaced 1-7/8 inches apart. To find the spacing for a different size bin, just subtract the total width of seven pickets (or however many you use) from the distance between the posts, then divide the result by 8 (the number of spaces between pickets). Use a 5-inch-high block of wood at the top to quickly establish the height for each picket.

7. Begin constructing the gates. Set the rails on your work surface so they are parallel and spaced the same distance apart as the bin stringers. Space the pickets 1-7/8 inches apart like the back wall, but start from the center–line up the center of the first picket with the center of the rail, then work to each side so you end up with roughly 1-7/8 inches between the last picket and the post. Fasten the pickets to the rails with 1-5/8-inch screws and construction adhesive. The construction adhesive helps prevent the gate from sagging over time. Check the assembly for square as you work.

8. Clamp or screw a straight piece of wood across the three front posts to support the gates while the hinges and latches are attached. Hang the gates using gate hinges–both gates open out and away from the center post. Install latch hardware for each gate so it locks closed at the center post.

9. Cut the four stops for the sliding divider panel from 2 x 2s. Make marks at 1-1/4 inches in from the edges on both posts. Install the 2 x 2 stops against these lines with predrilled 3-1/2-inch screws, creating a 1-inch slot at the center. The outside edges of the stops will overhang the edges of the posts by about 1/4 inch.

10. Build the divider panel using the same construction techniques used for the gates, but extend the outside pickets beyond the 2 x 4 rails so they fit into the channels between the stops. Space the pickets 2-1/8 inches apart. The total width of the panel should be about 1/2 inch narrower than the distance between the posts so that the panel can slide in and out without binding. To keep the divider panel at the same height as the rest of the enclosure, screw in a small wood stop or a few screws near the bottom of the slot.
Composting is key in a truly self-sufficient garden, and the only thing better than an active composting bin, is a doubly active bin.
TIP: Upgrades
Add a touch of beauty to your compost bin by attaching a decorative post cap to the top of each 4 x 4 post. You can find a wide variety at home centers or online. You also may want to fasten a 2-foot-wide strip of 1/2-inch hardware cloth down to the ground around the inside of the compost bin to help keep all the compost inside the bin.
More DIY Plans from Practical Projects for Self-Sufficiency:
• Multi-Purpose Garden Trellis Plans
• How to Make a Soil Sifter

Reprinted with permission from Practical Projects for Self-Sufficiency: DIY Projects to Get Your Self-Reliant Lifestyle Started by Chris Peterson and Philip Schmidt and published by Cool Springs Press, 2014.


