Learn how to engrave wood with burning to create a wood-burned cutting board that’ll make a striking and memorable keepsake.
Wood-burned cutting boards make original, functional, and beautiful gifts. With inexpensive materials and a little bit of know-how, you can create an item that your loved ones will be able to display or use as they wish – and cherish forever.
Tools and Materials
- Wood-burning tool
- Permanent markers or acrylic paints (optional)
The Cutting Board
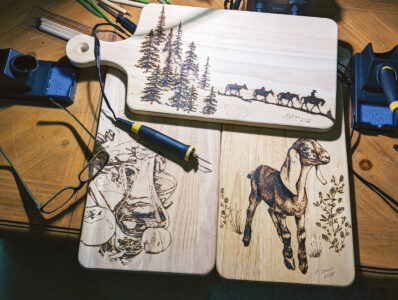
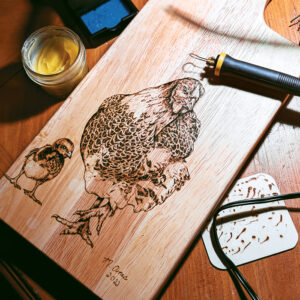
When I first created these artistic cutting boards, I needed a surface that burned well, was inexpensive, and had a handle or peg hole so the recipient could display it if desired. I priced oak, maple, and bamboo, but I didn’t expect the perfect medium: rubberwood. As a byproduct of the rubber industry, this hardwood is light in color, has a beautiful grain, and is inexpensive. And it burns beautifully too. I found 18-1/4-by-8-inch wooden bread and charcuterie boards from Webstaurant for about $11 – often on sale for about $7. This size allows me to select images, print them on 8-by-11-inch sheets of office paper, and fit them over sheets of carbon paper.
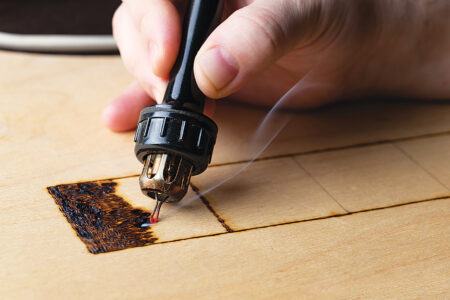
The Wood-Burning Tool
Forget the $10 wood-burning “pens” sold at craft stores. I burnt my fingertips so badly that I couldn’t unlock my phone for two weeks.
Spend about $40 more for a pyrography “kit” with pens connected to the power source by cords. This kit will have interchangeable two-pronged wire tips, and the power source adjusts wattage. These kits are much kinder to fingers, and the tips will help you discover which work best for your art style.
Don’t spring for the $200 kits until you know whether you’ll be invested in pyrography. A $50 kit will provide what’s needed until you’re ready for a high-end tool.
Carbon Transfer Paper
Carbon transfer paper costs around $6 for 100 sheets and includes ball-tip tools for tracing lines. Grab a pack when you buy your pyrography kit. Even if you intend to freehand most of the artwork, carbon transfer paper will help you burn the basic outlines and avoid mistakes.
The Printed Image
Perhaps you want to print a photo you took. Perhaps you intend to use a stock photo. Either way, save time and errors with a few keystrokes by resizing the image in a word or photo-processing program and printing it in black and white. Sandwich the carbon transfer paper between the image and the board, and then use the ball-tip tool to draw outlines onto the wood.
A Little Color
Before adding color, first consider how your loved one will use the cutting board. Many permanent paints, especially red pigments, contain toxic ingredients, such as cadmium. If the board will serve as an art piece, this is less concerning. But if the recipient might use the board for food, select nontoxic paints or forgo color.
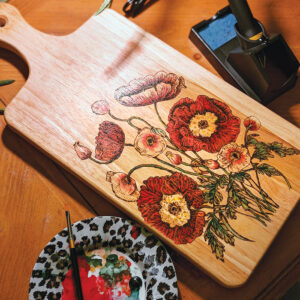
Use higher-end paints for the best color. Undiluted paint might peel off later, but paint diluted with water will sink into the wood for a long-lasting watercolor effect.
A simple permanent marker will deepen shadows and create more dimension on your finished piece.
Add Spoon Butter
Protect the final image and bring out natural wood grain by mixing 1 part melted beeswax with 3 parts unrefined coconut oil to create spoon butter. Allow it to cool, then use your fingers or a paper towel to rub it into the finished cutting board. Apply the spoon butter after completing all burning and color.
Know Your Worth
Several years ago, I burned the image of a Nubian goat kid onto a cutting board for a dear friend. Delighted, she asked to share the image in a popular Facebook group for goat owners. I agreed, though we both knew what to expect. So, she didn’t tag me.
As expected, the replies poured in. “I want your friend’s info.” “Will she do one for me?” People wanted one, but they didn’t want to pay for it.
Another group member asked a persistent person, “What would you pay for a piece like this?” The persistent person replied, “$25.”
Hmm, that would cover the cutting board, shipping from Webstaurant, and about 25 cents per hour for the work. No, thank you.
Though these cutting boards could become a side hustle with the right customers, earning what they’re worth takes work and planning. I’m too busy for that. So, at least for me, they’ll remain a cherished gift that costs little in materials but is priceless in the thought and love involved.
Tips for Success
- Take your time. I like to trace the image, then walk away. Burn the outline, then walk away. Freehand a few details, then – you guessed it. Walking away means approaching the work with a fresh eye.
- Avoid distractions. Twice, I’ve placed hot tools into plastic holders without looking. A few minutes later, I sniffed the air and cursed. But, for a $50 kit with cheap tips, melted plastic wasn’t much of a loss.
- Honor copyrights. If you intend to sell the finished product, avoid using licensed images or other people’s photography. You’ll rarely get in trouble for burning a licensed character onto something for your sister’s kitchen, though.
A former editor for Mother Earth News, Marissa Ames lives with her family in Idaho. She and her husband travel to Zambia to teach agricultural workshops in rural villages.
Originally published in the October/November 2025 issue of MOTHER EARTH NEWS and regularly vetted for accuracy.


