Learn how to build a cabin in the wilderness by watching the wind and light rotate through the property and following a cabin build from conception to completion.
Long before I used string on stakes to mark the site of my cabin – on a hill on the edge of a forest in Skagway, Alaska – I thought about its surroundings and how the building would blend in. Thanks to my previous experience building a too-big timber-frame house in downtown Skagway, I spent time on the hill lot looking at how the light rotated through the property and in what direction the prevailing wind blew. The gusts from the Yukon Territory can roar down the valley at 75 mph; you have to pay attention.
Finally, I picked a spot that would require fewer trees to be cut and would have room for my parked truck. And with a site selected, it was time to begin the build.
Cutting and Clearing
My neighbor and buddy Bruce Schindler helped me cut trees to clear the site. As soon as he started to cut the last tree, his blade got stuck. He said he’d go get some rope, and if the tree started to fall, to just take hold of the chainsaw and walk slowly to the right. As soon as he rounded the corner, I heard a crack, and, sure enough, that tree started to fall. But I followed his directions and, thanks to his advice, stayed safely out of the way. When he saw me and the tree as he was walking up the trail, he started to laugh.

After clearing trees came the task of burning the brush, which, in a forest, comes with much responsibility. Because of the “duff,” decaying plants covering the ground under trees and making it too dangerous for a burn, I waited for winter and a good snow cover to burn the brush.
How to Build a Cabin in the Wilderness
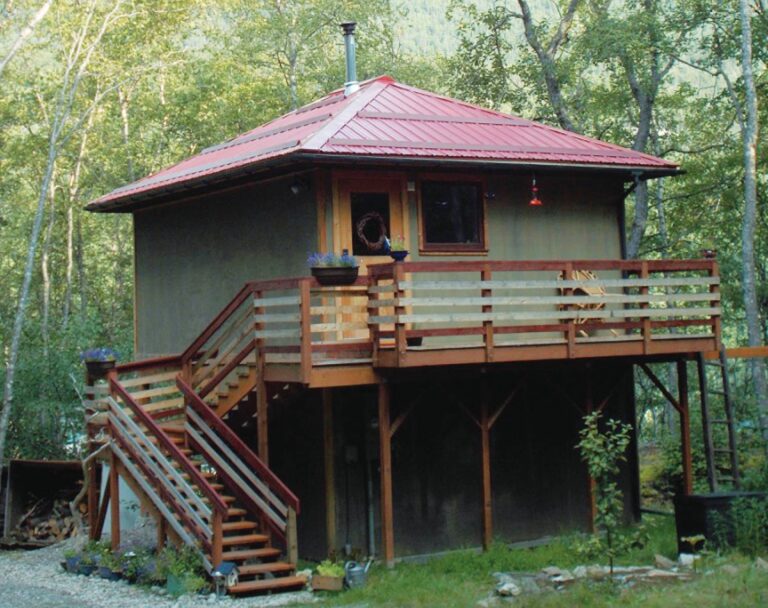
For the cabin plan, I turned to Summerwood, a Canadian builder in Toronto that offers cabin kits either precut or pre-assembled. Summerwood will ship its kits, but because I was so far away, I just used its “Archer” blueprint and sourced my materials elsewhere.
My cabin’s simple hip roof, made of red metal, would look like a giant Amanita muscaria mushroom in the woods. The roof would be superinsulated to allow a visually pleasing tongue-and-groove ceiling, like the innards of a wooden boat. After the build was finished, I often lie on my back and admire that ceiling.
I dislike attics and cellars, so my cabin would have neither.
I mail-ordered the Sardine, a cast-iron woodstove designed for boats and built by Navigator Stove Works out of Orcas Island, Washington. At 12 by 12 by 11 inches, it was a perfect fit and weighed only 35 pounds. Because it’s so small, I also added two electric wall heaters to cover the drop in temperature at night.

My builder, Michael Yee, teased me when I insisted the front door open outward to keep bears from forcing their way in – but it’s a known occurrence in my neighborhood, and better safe than sorry!
From Macro to Micro
After designing the cabin, I focused on the smaller components that make up a home, including lighting, hardware, and appliances.
When Michael asked whether I’d like sharp or rounded corners on my sheetrock walls, I was flummoxed that I had a choice. I’d never thought about it.
I did have definite thoughts about lighting, electrical-outlet placement, and interior paint and exterior stain colors. Influenced by having watched my father climb a ladder up the side of the Victorian home we lived in to remove old paint with a blowtorch and scraper, I determined exterior stain was better than paint.
I’d also learned from living in other small places that the light coming in through windows would easily cover a room with a width of under 20 feet. This is important in cold climates where winter light is weak and thus depression is strong. Because natural light would stream through my small cabin, it would have only one overhead light over the dining room table; the rest would be sconces, which would light the kitchen cheerily. Over my desk, I mounted a swing-arm lamp on the wall that I can pull closer when I need more light.

Oh, the Effort!
After I was satisfied with those details, the cabin build began.
Throughout the build, I relied on packing crates, which are free and have a variety of uses, especially as wood storage; I’d just nail an odd piece of plywood on top and then cover it with tar paper or metal roofing. I moved the crates around the property by myself using plastic pipes underneath as rollers.
While Michael and his crew handled most of the construction, a couple of agile high schoolers (who balanced effortlessly on the tops of sawhorses) did the exterior staining, and I had the task of adding the horizontal 4-by-2-inch porch railings and staining them. The lumber was 20 feet long, so I leaned it up against one end of the porch, went up the ladder, and screwed in that end just enough to have some play. Then, I went down the stairs, wrapped a piece of rope around the other end, attached that to a rock, and threw it up on the porch. I then lifted the unscrewed piece, leveled it, screwed it in with some give, and then went back and forth between the two ends to tighten them. I’m still trying to wrap my mind around whether my process was efficient. The stair railings were much easier to do, as the steps up to the main cabin floor were built to allow for my short legs to walk up without difficulty as I age.

Inside, I sanded and sealed the tongue-and-groove ceiling and floor and painted the walls after I’d insulated them.
As the building process progressed, my design decisions multiplied. The interior was 16 by 20 feet, with each living space demarcated by one wall.
In the galley kitchen, I had Michael add a cutout on one wall to hold spices, and above, I used dowels and some metal plumbing pieces to attach them to the wall for bulk pasta, grains, and beans.
The birch plywood kitchen cabinets Michael had made for the first house I’d built were thrown out by the new owner, so I salvaged them. Using a reciprocating saw, I cut a couple down to size. I picked up a wood dish rack at a yard sale to hold dishes, and a sink and countertop from Ikea fit the space (and my budget) perfectly.
Making Do with Little Plumbing
In the utility room under the main floor is my composting toilet, water tank, electric hot water heater, and a pump to get the water to the kitchen.
There’s no septic system; only an underground greywater reservoir the kitchen sink drains into. And we didn’t include a shower; I shower at the recreation center downtown. There’s also no well, so I run a 100-foot hose through the woods to Bruce’s outdoor faucet to fill my water tank. I stand at the sink as I do the dishes and marvel, thinking of the Alaskans with a “dry” cabin, meaning they have to haul water home. Even though I have less plumbing than some, I feel lucky.

Cozy Cubby
On the side of the cabin opposite the kitchen, I built a platform for my mattress, and I again reused kitchen cabinet drawers for underbed storage. Over the bed, I built a shelf for extra storage, but my arms weren’t long enough to attach it! Enter Bruce, who held it up while I nailed it in. I’m glad to have neighbors who share their wells and help complete my walls.
I attached a shower rod with curtains to the underside of the shelf for those summer days when the sun shines for over 18 hours. In winter, I leave them open and watch the night sky, sometimes catching sight of a meteorite flying by or the fabulous colors of the Northern Lights.
For 30 years, Dimitra Lavrakas has reported for newspapers and magazines in Alaska, from the Arctic Ocean to the Aleutian Chain, and towns and cities in between.


