
This chair, made from pallets, is the perfect addition to any whimsical outdoor space or rustic living area. Believe it or not, you don’t even need to dismantle all of the pallets to make it. When you’re picking up pallets to build these Adirondack chair plans, look for ones that don’t have wide gaps between the slats.
If need be, you can also attach additional slats between any extra wide gaps once you get them home. We wouldn’t want anyone falling through their chair.
Take extra care when sanding since you’ll be sitting in and lounging on her when she’s done. You might not find the wood alone the most comfortable spot to sit, but that’s nothing a nice thick cushion can’t remedy. Be sure to buy pillows made to stand up to the elements if you plan to leave them outside. The measurements in these Adirondack chair plans are specific to the measurements of the full pallets used; double-check your measurements as you go. If you want a frame of reference, measure to see how high your sofa is to determine a good height for this seat.
Adirondack Chair Plans

Investment: this project only takes a couple of hours and doesn’t really cost a thing if you’re using all pallet wood.
Supplies:
• 2 full pallets about 30 inches square (1 for the chair seat and 1 for the chair back)
• 4 pallet support boards about 12 inches long (you can use 2×4s if you don’t have any support boards on hand)
• 2-inch screws
• 1/8-inch drill bit (optional)
• 4 pallet support boards about 24 inches long (for the legs)
• 4-inch screws
• 3 support boards about 35-1/2-inches (for the arms and back support)
• 3-inch screws
• multiple grits of sandpaper, ranging from coarse to fine
Tools:
• tape measure
• reciprocating saw (if you need to cut a pallet to size)
• miter or handsaw
• hammer or mallet
• cordless drill
• carpenter’s square
• palm sander (optional)
Instructions:

1. If necessary, measure and cut your full pallets to your desired size with your reciprocating saw. The pallet for my seat measures 29 inches square. I cut a 32-inch square pallet down to 29 inches wide so it would line up with the width of the seat, but left the height at 32 inches.
2. Use a miter or handsaw to cut the 4 support boards 12 inches. Insert them into the open sides of the pallet slat you will use for the seat, 2 per side (the sides are the edges of the pallet that do not have support boards running along them). You may need to use a hammer or mallet to help them into place.
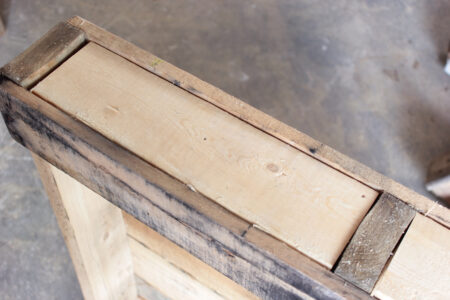
3. These supports don’t have to fit perfectly. These sides of the pallet will be the sides of the chair (not the front and back), so if they are a little too short, make them touch the middle support board that is in the pallet and runs perpendicular to where you are inserting the support board pieces. Any gap at either end will end up hidden behind the legs.
4. Use your cordless drill and 2-inch screws to attach these new support pieces. Drill through the pallet slats and into each new piece, 2 screws per piece from both the top and the bottom of the pallet. You can drill pilot holes with an 1/8-inch drill bit if you want to prevent the pallet slats from splitting, but it’s not required.
5. Use a miter or handsaw to cut the 4 pallet support boards for the legs 24 inches long.
6. Use your tape measure to measure and mark 15 inches up the inside of 2 of your leg support boards.
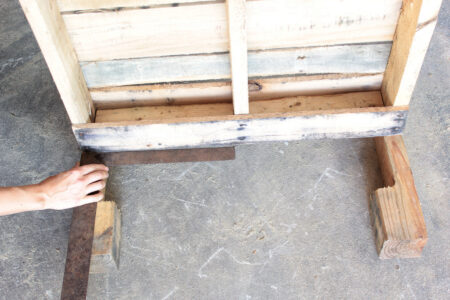
7. Lay those 2 legs on the ground about 30 inches apart with the marks facing each other and line up the top of the pallet for the seat with your marks. Line up each side of the pallet with the inside edge of each leg, then check for square with your carpenter’s square.
8. Using your cordless drill and 4-inch screws, attach the legs to the side of the pallet. Drill from under the pallet, through the pieces you attached in step 4 and into your leg boards.

9. Repeat steps 6-8 to attach the other 2 legs to the opposite side of the pallet. You now have a backless seat.
10. Measure the width of your seat, from the outside of 1 leg to the outside of the other leg; mine measured 35-1/2 inches.
11. Cut 1 pallet support board for the back support to this measurement with a miter or handsaw.
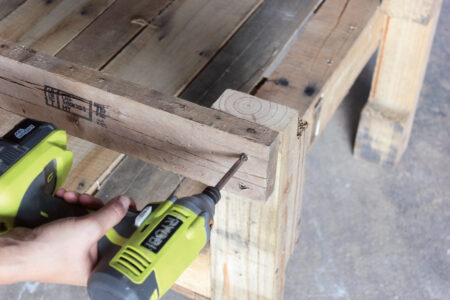
12. Line up this support board horizontally along the back of the 2 back legs. Line up the top edge of the support board with the top of the legs. The flat side of the support board should be facing into the seat. Attach through the support board into the legs with 2 or 3 (3-inch) screws at each end.
13. Measure from the back of the just attached support board to the front of the front legs and add about 5 inches to that length (if you are following the measurements provided, it should be about 35-1/2 inches).
14. Cut the last 2 support boards to that length with a miter or handsaw–they will become the arms of the chair.
15. Line up each of these support boards on either side of the seat, with one end lining up with the back of the support board that runs horizontally across the back and the flat side of the board facing down; they will overhang the legs in the front.
16. Attach with 3-inch screws, 2 or 3 screws into each leg.
17. Sand the entire project, including the pallet for the back (which isn’t attached yet). Start with coarse-grit sandpaper and then use medium grit, maybe even finishing with fine-grit sandpaper on the arms.
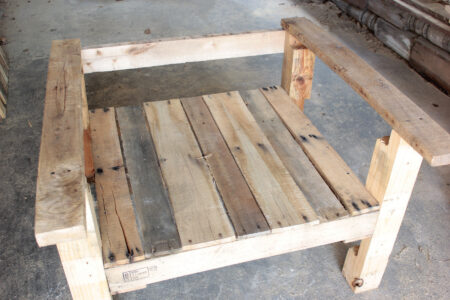
18. Rest the pallet for the back at whatever angle you desire up against the support board running across the back. It is not necessary to attach it, and it is nice to have the flexibility to adjust the angle depending on how “loungy” you’re feeling on any given day.
19. Add cushions and pillows as desired.
Want to find more creative uses for wood pallets? Try these other ideas:
• DIY Shutters
• Make Your Own Flag From Pallets

This excerpt has been reprinted with permission from DIY Wood Pallet Projects, written by Karah Bunde and published by Adams Media, 2014.Buy this book from our store: DIY Wood Pallet Projects.


