Construct this rocket stove using only three tin cans.
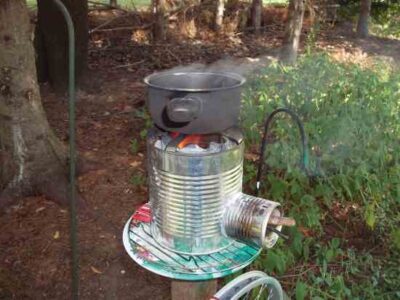
I recently Googled “rocket stoves” and was inspired to build this version. I started with an empty soup can, a half-gallon juice can and a gallon can, and within an hour, I had a tin can stove I could cook an individual meal on.
To assemble: Near the bottom of the two larger cans, using tinsnips, cut a hole in both big enough for the soup can to just fit into. Nest the half-gallon can inside the gallon can.
Push the soup can, minus its top and bottom, through the holes in the nested cans. Fill the space between the gallon and half-gallon can with perlite or dry wood ashes for insulation. Find some kind of small grate to put on top of the can to hold your cooking vessel.
To start the fire, I dropped a piece of newspaper into the upright cans, inserted a handful of dry twigs through the soup can, and dropped in a match from the top. Within a few minutes, I had enough heat to boil a hot dog in beer.
Walt Lund
Kalkaska, Michigan
Whether you want to learn how to grow and raise your own food, build your own root cellar, or create a green dream home, come out and learn everything you need to know — and then some!
LEARN MORE
I tried to email this article to my husband but got a "runtime error". Please fix this! Thank you! :)
if you insulate the fire area from the outside and also from the cooing convection effect of the outside metal your fire gets hot enough give you a secondary and clean burn of the gases being released from the burning wood.
Waste of beer, should have boiled the hot dog in water and drank the beer ;-)
It's the insulated chimney that makes it a rocket stove.
Nice stove. But I am not understanding the "Rocket" reference. I too have looked at rocket stoves and according to your directions, I believe all you have built is a side-loading fire pit. If I am correct, what is the purpose of nesting the cans and filling the space with perlite or ash? Perhaps I missed something?