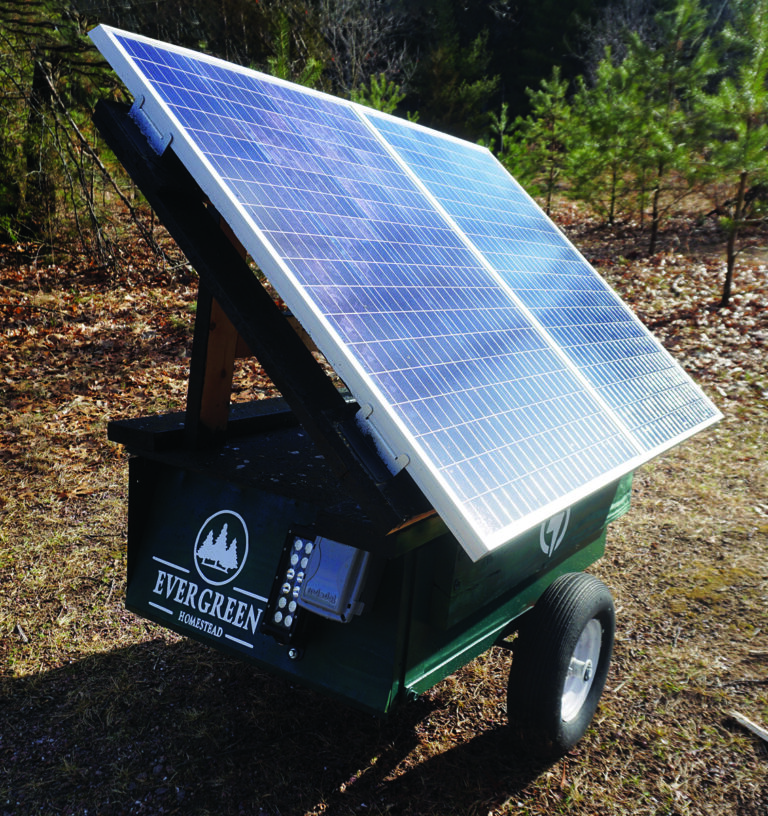
Over the past five years, my wife and I have built many outbuildings and tackled numerous projects around our homestead. First came the chicken coop, followed by a greenhouse, a garden, a dog kennel, and even a small ice-skating rink! Each of these projects has one thing in common: They need electricity. We had been using a small gas-powered generator, but it was loud and expensive to run. For a more sustainable option, we decided to build a portable solar-powered generator.
Our solar generator provides us with 115 volts of power that can be moved anywhere on our property. We built it using an old garden trailer, so we can simply hook the trailer up to our ATV and relocate it as needed. We’ve used it for several months now, and it’s performed flawlessly. So far, we’ve used it mainly to power our dog kennel, which includes four lights, a ceiling fan, a radio, and a large exhaust fan. During the first week, the solar panels absorbed enough sunlight not only to only sustain the kennel, but also to store an extra 1/2 volt.
We tried to source as many materials from our homestead as possible for this project. We already had the garden trailer, scrap lumber, wire, insulation, and, most fortunately, four 12-volt, 40-ampere-hour (Ah) sealed batteries from an old electric scooter. We purchased two solar panels, a 1,600-watt power inverter, and a charge controller.
Tools and Materials
This is the list of items and approximate lumber dimensions we used; you’ll likely need to tweak it some for your own project.
Cut List
From the 2×6:
- 40-inch side (2)
- 24-inch front
From the 1x4s:
- 57-inch solar panel frame sides (2)
- 24-inch solar panel frame front and back (2)
- 54-inch crosspiece
From the 1×6:
- 57-inch solar panel connectors (2)
From the 2×4:
- 40-inch front support for solar panel frame
- 52-inch back support for solar panel frame
- 24-inch legs (2)
- 29-inch crosspiece
From the 5/8-inch plywood:
- 24-by-40-inch rectangle for battery box cover

Step 1: Build a Battery Box
We used an old garden trailer as the base for our generator, and built a wooden enclosure around it to house the batteries, inverter, and electrical components. This way, we had something substantial on which to mount the battery cover and panels, and the wood reinforced the trailer walls. (Had we been skilled welders, we would’ve used metal to reinforce the walls, but our skills are better suited to woodworking.)
To make the box, we measured and cut 2×6 panels to fit the sides and front of the trailer, and then screwed them directly into the trailer’s metal walls on the exterior. We also screwed the boards together where they met at the corners.
Next, we measured and cut a piece of plywood to fit over the top of the trailer, and attached it using two hinges mounted to one of the 2×6 side panels. This hinged cover provides access to the batteries.
Ideally, all the lumber and plywood for this project would be pressure-treated, but we wanted to use scrap lumber we already had on hand, so not everything on our generator is pressure-treated. We chose to waterproof all the wood with Flex Seal after construction instead.
Step 2: Build a Frame to Mount the Solar Panels
We flipped the solar panels over to access the backs of them, and connected them to each other using two 1x6s attached to solar panel mounting Z brackets, with two brackets on the outside edge of each panel and two brackets in the center where the panels meet.
We then built a four-sided frame for the panels using 1x4s. We first screwed two 1×4 boards directly on top of the 1x6s mounted on the solar panels, and then attached a 1×4 across either end, to create a rectangular frame. We attached a piece of 1×4 that runs from one inside corner of the frame to the diagonal inside corner.
We then cut and attached two pieces of 2×4 to the plywood battery cover, one shorter board on the front of the cover and one longer board on the back to support the frame. We overhung the sides by a couple of inches so the 2x4s would line up with the 1x4s on the solar panel frame, which are spaced slightly wider than the 24-inch-wide battery box cover. We then added a set of hinges to one long side of the solar panel frame, and mounted it to the 2×4 that we attached to the back of the plywood cover. This created a two-hinged cover: the plywood battery cover, and the solar panel frame hinged on top of that.
We didn’t have enough 2×4 scraps on hand, or else we would’ve built the frame entirely out of 2x4s. This would’ve eliminated the need to stack 1x6s and 1x4s.
Step 3: Create a Hinged Bracket to Support the Panels
If you search online for “solar panel angle calculator,” you’ll get numerous results that’ll help you determine the best angle at which to position your solar panels, based on your location and the time of year. For simplicity, we chose to keep our panels at a 45-degree angle year-round. To support the solar panels, we built a hinged bracket out of 2x4s.
To build the support, we positioned the panels at about 45 degrees, and then cut two pieces of 2×4 to height for the bracket legs. Using small hinges, we attached the two legs to the solar panel frame. We then added a crossbeam to connect the legs, making the support one movable piece instead of two separate legs.
With this support in place, we’re able to lay the panels flat on the trailer during transport and then hinge them up to collect the maximum amount of sun while charging.
Step 4: Insulate the Battery Box
We have freezing-cold winters in Wisconsin, so we knew we’d need to insulate the generator to keep the batteries as warm as possible. Using 2-inch foam insulation we had left over from another project, we cut out panels to line the bottom, sides, and top of the battery box, and then sealed the edges with spray foam insulation.
We then measured and cut pieces of scrap 1/4-inch plywood to line the sides of the foam, and then screwed them into place. This step isn’t necessary, but it gave us a place on which to staple any loose wiring so it remains out of the way.
Step 5: Wire It Up
We used a 12-volt system and wired the batteries in parallel using battery cables. This means each positive is wired to another positive terminal, and all negatives are wired together, creating one large 12-volt battery bank.
The battery bank feeds into the 1,600-watt inverter, which converts the 12 volts into 115 volts. Everything else is central to the solar charge controller. We connected the battery bank wires (positive and negative) to the two center screws of the solar charge controller. The controller is neatly labeled. Keep in mind that it’s important to connect the batteries first and the panels second.
Next, with the help of solar extension cables, we connected the solar panel wires (positive and negative) to the first two screw terminals on the charge controller. We used waterproof Y-branch connectors, combining each set of wires from each panel down to one positive and one negative wire that feeds into the charge controller.
One main function of the charge controller is to ensure that the batteries don’t overcharge. By default, when the batteries reach a full charge, the controller disables the power to protect them from overcharging.
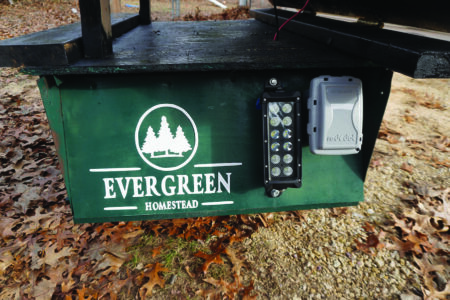
The charge controller also has a third “load” set of screws. This is to power any 12-volt devices. There’s a power button on the controller for any load applied here. In our case, we used this to power a 12-volt LED light that we mounted on the outside of the trailer in Step 7. Unlike the 115 volts from the inverter, this power comes directly from the battery bank by way of the charge controller.
Step 6: Waterproof and Paint
Because some of our lumber isn’t pressure-treated, we used Flex Seal to waterproof all the exposed wood, ensuring a long-lasting, weather-tight seal. We also painted the trailer and wheel hubs to make the whole thing look nicer.

Step 7: Add an External Outlet and Light
While we could lift the battery cover and connect an extension cord directly to the power inverter, we wanted a more convenient access point, so we mounted an external waterproof outlet to the outside of the trailer. We wired a plug to the inside of this outlet and plugged it into the inverter.
We also added a 12-volt LED light next to the outlet. It provides a nice light to brighten up any nighttime projects.
My wife, Jen, used her Cricut machine to make a few vinyl stickers to adorn our solar trailer. We made one with the name of our homestead and affixed it to the rear of the trailer, and attached a voltage symbol to each side.
We documented this entire project on video. For a detailed step-by-step, visit our YouTube page.


