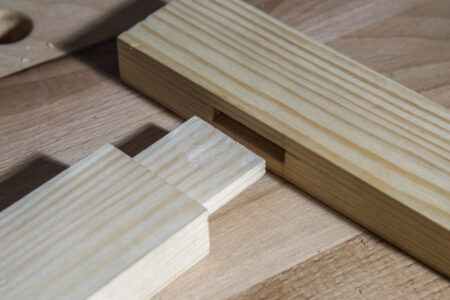
Simple mortise-and-tenon joints that meet at right angles can be made satisfactorily with power tools, but the ability to cut a mortise and tenon by hand opens up a much wider range of applications and design possibilities. In this excerpt, we will go through the step-by-step process of cutting a simple, blind mortise and tenon by hand. The skills involved — measuring, marking, sawing, chopping and paring with chisels, sharpening, and fitting — are basic building blocks of wood craftsmanship.The mortise and tenon is the most important joint in furniture making. There is no stronger or more permanent means of joining two pieces of wood together in situations where the end of one board meets the edge of another. Mortise-and-tenon joints can be cut with hand tools, power tools, or various combinations of the two.
Don’t expect your first, second, or third mortise and tenon to be perfect. The first one may be terrible, but each subsequent one will be an improvement. Once you master the process, you will be technically and psychologically ready to learn any aspect of furniture making.
To prepare for this project, cut the piece of wood milled in the previous project in half to make two pieces 3/4-in. by 2-1/2-in. by approximately 12-in. long. The exact lengths aren’t important, but make sure the ends are square.
How to Cut a Mortise
Mortises are almost always cut before tenons because there is more flexibility in sizing a tenon to fit a mortise than the other way around. The general rule for thickness, when joining a frame, is that a mortise should be approximately one-third as thick as the wood into which it is cut. The specific thickness of a hand-cut mortise is determined by the nearest size of chisel. For example, a mortise cut in a piece of 3/4-in. wood should be 1/4-in. thick, with 1/4-in. shoulders on each side. A mortise cut in a piece of 7/8-in. wood could be either 1/4-in. or 5/16-in. thick, as long as you have both size chisels to choose from.
The depth of a mortise should be at least twice, and preferably three times, thickness. It also should be a little deeper than the anticipated length of the tenon, just to be sure the tenon won’t bottom out. The width can vary considerably. Our mortise will be 1/4-in. thick, 13/16-in. deep, and 1-1/2-in. wide, with 1/2-in. shoulders at each end.
There are many ways to cut a mortise. The most basic is to chop it out with a mortise chisel and a mallet. At the other end of the spectrum are mortises machined with horizontal slot mortisers or hollow-chisel mortisers. Mortises can also be made with routers. The method presented here emphasizes hand skills but employs a drill press for quick removal of waste. It is reasonably efficient and offers substantial control, leading to accurate results with practice.
Wood Choice Affects the Joint
The experience of cutting a mortise and tenon is affected by the species of wood. A soft hardwood, such as poplar, cuts and assembles relatively easily; the wood compresses enough to forgive some fatness in the joint. A denser wood such as cherry offers greater resistance to the saw and chisel and must be cut to closer tolerances for a good fit, but it also works much cleaner and crisper.
Tools and Materials
- Folding rule
- Mortise gauge
- Marking knife
- Square
- Mallet 1/4-in. and 1-in. chisels
- Drill with a 3/16-in. brad-point bit
- Pencil
Step 1: Mark Out the Mortise
First, decide which of the two pieces of 3/4-in. by 2-1/2-in. by 12-in. wood is for the mortise and which is for the tenon. Position them with the tenon piece butting against the mortise piece to form a corner. Mark the face of each board so you’ll remember how they go together. Later, when you use the mortise gauge, be sure to mark from the “face” side of each board. Scribing from the face of one and the back of the other would misalign the joint to the extent that the gauge wasn’t perfectly centered.
To mark the mortise width, measure in 1/2-in. and 2-in. from the end of the board on the edge where the mortise will be located. Mark each measurement with a knife prick. Square the marks across the wood with a knife.

Mark the mortise ends square across the edge of the board with a knife.
To mark the mortise thickness, set the mortise gauge so that the distance between the pins is just over 1/4-in. The extra smidge helps ensure that the chisel won’t stick in the mortise. Then set the distance from the fence to the nearest pin at 1/4-in. With the shoulder of the gauge firmly against the face of the board, scribe the thickness of the mortise from knife line to knife line. I find it easiest to pull the gauge with the pins angled slightly away so they drag rather than dig in.
For this project, there is no reason to have a perfectly centered mortise, but if you want one, set the gauge as explained above. Then use it to make pin pricks from opposite faces of the board in the same location. If they coincide, the gauge is centered. If not, readjust the fence until they match.
Save the setting on the mortise gauge for marking the tenon.

Scribe the mortise thickness with a mortise gauge.
Step 2: Pare Back to the Knife Line
Hold the wood between bench dogs, in a vise or clamped to the benchtop. Working from the waste side, pare back to the knife lines at each end of the mortise with a sharp 1/4-in. chisel. Pare with the bevel down for greater control. Paring creates a straight-backed groove that will guide the chisel while chopping the ends in step 6.

Although it’s good practice to pare back to marks cut across the grain with a knife, as we are doing here, don’t pare back to the indents you made with the pins of the mortise gauge. They are ideal just as they are for starting a chisel cut with the grain, where there is far less resistance.
Use a chisel to pare back to the knife lines at each end of the mortise.

Tool Tip: Whenever you pare with a chisel, keep both hands behind the blade. More than once I have seen students ignore this advice and stab themselves. A bench dog, stop, or vise should be used to hold the board steady, not a hand in front of the blade.
Step 3: Drill Out the Waste
Drill out the waste with a 1/4-in. or smaller brad-point bit. Begin with holes about 1/8-in. from each end, then connect them with a series of (ideally) contiguous holes. The small amount of wood left at each end gives you something to pry against when chiseling out waste without denting the finished lip of the mortise.
Use a drill press, electric drill, or hand drill. If you are using a drill press, the edge of the board that sits on the table must be square to the sides; otherwise the holes will run crooked. The extension slide on a folding rule is useful for checking the depth of the first hole.
Don’t worry if you happen to drill a little bit beyond the scribe lines for the cheeks. The joint will still come out fine. The half-moon indentation that remains in the cheek after you’ve cleaned out the waste will reveal whether you’ve pared straight or crooked by the uniformity of its width from top to bottom.

Drill out the mortise waste with a series of near-contiguous holes, using a drill press, electric drill, or hand drill.
To Use a Drill Press
• Make sure the table is set square to the bit. Adjust the height of the table to bring the wood close to the bit.
• Set the depth stop to make holes that will go 13/16-in. beyond the surface of the wood.
• When drilling a piece this size, hold the wood firmly on the drill table with your free hand. Smaller pieces, which might spin out of control, should be clamped in place or held against a fixed fence.
• Although I usually eyeball the locations of the holes as I drill, you may prefer to clamp a fence on the drill table as a guide. The holes don’t have to be perfectly centered within the mortise.
To Use an Electric Drill or Hand Drill
• Wrap masking tape around the drill bit, 13/16-in. from the cutting edge, to indicate the desired depth.
• Clamp the wood firmly in a vise or to your bench.
• Visually align the drill from the front and the side to make sure you are drilling as straight as possible.
• If desired, scribe a line down the center of the mortise with a marking gauge to provide a pilot location for the bit.
Step 4: Chop Down Just Shy of the Ends
Hold the wood on the benchtop with bench dogs or a clamp. Locate your 1/4-in. chisel at the edges of the holes closest to the ends (see the photo below) with the bevel facing inward. Drive the chisel with a mallet until it hits the bottom of the mortise. You can do this without much resistance because the holes provide space into which the waste can collapse.

Chop clear to the bottom where the holes have been drilled at both ends.
Step 5: Pare Down the Sides
Set your 1-in. chisel in one of the small grooves left by the mortise gauge. The bevel should face into the mortise. Position yourself so you are looking down the length of the board, which enables you to see if the chisel is vertical. Gently tap the chisel with a mallet to cut straight down the side of the mortise. Don’t drive the chisel too far, or the wood will split. The chisel should be razor sharp.

When you have cut partway down both sides in this fashion, use the 1/4-in. chisel to clean out the waste. Resume paring the sides, cleaning out the waste as you go, until you reach the bottom of the mortise.

Pare down the sides of the mortise with a 1-in. chisel.
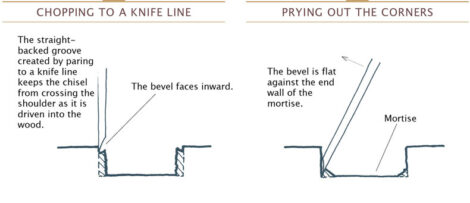
Step 6: Chop the Ends Back to the Knife Line
Rest the 1/4-in. chisel against the knife line at each end of the mortise. The bevel should face inward. The small shoulder that you created by paring back to the line in step 2 prevents the chisel from pushing beyond the knife line as you force it into the wood.
Drive the chisel straight down with a mallet, chopping clear to the bottom of the mortise. To clean out the bottom corners at each end, tap the chisel in with the bevel flat against the end wall of the mortise. By prying with the bevel against the wall of the mortise, you can avoid denting the lip of the mortise.

Step 7: Pare the Cheeks and Ends Square and the Bottom Clean
The cheeks of the mortise should be square to the surface. Check this by holding the back of a chisel flat against each cheek, as shown in the photo at right, and sliding a small square up to it. If a cheek is angled into the mortise, gradually pare it square. If a cheek is angled such that the mortise gets wider at the bottom, just live with it for now. You’ll improve with practice.
Remove all waste to give the mortise a flat, clean bottom. Check the depth with a folding rule.

Check the mortise sides for squareness with a square and a chisel.
Tool Tip: The ends of the mortise should be square to the surface or slightly back-cut at the bottom. Because the ends are end-grain surfaces that don’t take glue well, contact is not necessary along their entire depth, as it is with the cheeks.
Read more: The other half of this project involves cutting a tenon. Learn about what materials you need and how to do it in How to Cut a Tenon.
“How to Cut a Mortise” has been reprinted with permission from Woodworking Basics: Mastering the Essentials of Craftsmanship by Peter Korn and published by The Taunton Press, 2003.


