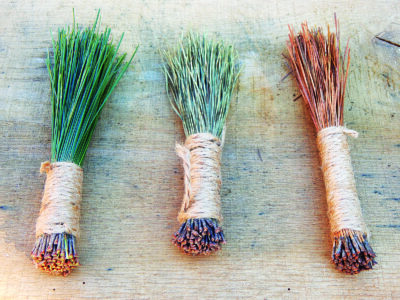
A Handy Broom
Brooms can be made from a variety of materials, such as broomcorn sorghum, straw, and plastic. A full-sized broom can help keep a home clean and tidy, but what about the often overlooked hand broom? These miniature brooms can clean small messes, such as ash around a fireplace or sawdust in a workshop. Dual-purpose hand brooms can be made easily from collected pine needles, and they’re not only functional, but decorative as well!
Only three things are needed to make these hand brooms: pine needles, scissors, and twine. Alternating the color of your twine to your liking for a personal touch is a great idea, but for this example, I’ve used a basic tan jute twine made from natural fibers.
Collect. Pine tree species vary across the world, but my area commonly hosts the loblolly and longleaf pines. You’ll need to collect needle clusters at least 8 inches long for this project. (The Virginia pine has a short needle length of 1 to 3 inches, which would be unsuitable.) Dried needles are easy to collect with a rake from the area surrounding your trees, especially during fall. For green needles, if you know someone who’s harvesting pines for lumber, you may be able to collect them then. The responsible method is to simply check under the trees after a good wind. Clusters of green needles not strong enough to withstand strong breezes are easy to find. You’ll have to strip the needles from the branch if they’re still attached.
Organize. You’ll want the needles to be in small groups still attached by the fascicle sheath at the base. Loose, singular needles are more likely to fall out of the broom. Face all your needles in the same direction, and line up the base of the needles evenly. Holding the needles together, pack them into the palm of your hand so all of them are even at the base. This will allow for all the clusters to be wrapped tightly together, which will prevent pieces from falling out, while also giving the broom a cleaner look.

Wrap. A slipknot can be used to allow a tight base loop closest to the sheath of the needles, which will make it easier to wrap the needles the remainder of the way. When using loblolly needles, I needed a segment of twine about 6 feet long to wrap one hand broom to the desired length. You’ll want to bring your wrapping tightly at least halfway down your group of needles to support the area that will be held in the hand, and tighten your cluster of needles close together for effective and practical use. Finish the wrap with a tight knot.
Finish. The easiest step of the process is to finalize the hand broom by using a pair of scissors to neatly trim the bristle end of the broom, snipping off the ends of the needles to an even length. Then, you can decide whether your piece will be for decoration or functionality. Make sure to keep your needle brooms away from any heat source, and keep them out of the reach of children and pets.
Fala Burnette
Ashland, Alabama
From Scraps to Scrumptious
Instead of throwing away scraps from peeling and preparing vegetables, or even putting them in the compost bin, my wife and I decided to take it one step further years ago and use them to make vegetable broth. First, brush and rinse vegetables well before preparing. Save potato, carrot, onion, celery, and other scraps, and place them in two 1-gallon zip-close bags. Place them in the freezer and save them until both bags are full. When you’re ready to make broth, add the scraps to a stockpot and cover them with water – at least 3 to 4 cups. Simmer on the stove for several hours. Strain out the scraps, and pour the broth into a container suitable for freezing. Thaw the frozen broth when you’re ready to make soup or a casserole. The interesting thing about this method is that the broth is different with every batch, depending on which vegetables you use. Truly a “soup of the day.” Bon appétit!
Mike Pokrinchak
Henryville, Pennsylvania

Ingenious Sheep Scale
I have a small flock of Icelandic sheep from which I sell market lambs by live weight in fall. In the past, I used to weigh them using a box and spring scale suspended from the bucket on my tractor. That tended to be a two-person job, and necessitated capturing the lambs in a small wooden pen so the tractor could be used to lift the weighing box.
Instead, I wanted to devise something that could be used inside my sheep shed, with the option of guiding sheep with a chute. Here’s what I came up with. The box measures 2 feet wide by 4 feet long and is constructed from a single sheet of 1/2-inch plywood and five 8-foot 2×4 studs. The lifting lever is a 10-foot 2×4 and is attached to the wall stud with a 3⁄8-inch bolt. A longer lever would make for a lighter lift. The important thing is to suspend the box near the pivot. The scale is a 660-pound digital scale that I ordered online for less than $30. The box is suspended from the scale with some nylon straps I had on hand.
The box has a door on each end, and I was able to lure most of my adult sheep into it by baiting them with a pan of corn. Once a sheep is in, I bolt the doors and lift the box off the ground by pushing the end of the lever above my head so it rests in the block attached to the doorway of the hay shed.
I can then record the weight shown on the scale. Finally, I lower the box and release the sheep.
Don Kilpela
Atlantic Mine, Michigan
Refurbished Field Fencing
The previous occupants of our property left several rolls of used field fencing that was too bent for fencing. We decided to use it to prevent our tomato plants from sprawling on the ground. I straightened out the rolls that were at least 20 feet long, connected the two ends to form a circle, and then shaped it into an oval that fit over a row (or partial row) of tomatoes. Using baling twine, I tied back and forth across the middle to help the fencing keep its shape, and to create braces for growing tomato limbs.
I’ve found that the fencing needs to be braced to keep it from falling over during a storm. To do this, I drove a stake into the ground and secured the fence to it with baling twine. I’ve made and used several of these cages, and find them easy to remove, store, and reuse the next year. These have been the best tomato cages I’ve ever had.
I’ve used lots of the ideas and advice from your publication, and I always look forward to the next issue. Thank you.
Tena Brown
Dobbins, California

Stocked Up on Raised Beds
I found a great way to keep rabbits and groundhogs out of my garden.
Old, worn-out, 3-1/2-foot stock tanks (for watering cattle or horses) can be turned into wonderful growing containers. I purchased three from a local farmer for a total of $25. The farmer was glad to get rid of them because the bottoms were corroded and filled with holes. I figured these would be perfect for drainage.
I sanded the rust off the sides and drilled extra holes in the bottom. Then, I painted the outside a copper color, just for fun. After this, I moved them into my garden and leveled them. I used a number of fillers. I filled the first third with hay, straw, or mulch. The second third I filled with topsoil. I topped the last 10 to 12 inches with garden soil.
We tend to have clay soil in Wisconsin, so raised beds make it much easier to grow successfully. I planted lettuce, spinach, kale, radishes, carrots, beets, and bunching onions. Bush beans and garden peas also do well in these raised beds. You hardly have to bend over to weed or pick vegetables.
Susan C. McDermott
Waterloo, Wisconsin

Nip ‘Em in the Bud
Here’s a no-spray method of removing squash bugs and their eggs from the squash plants in your garden. Grab a roll of painter’s tape or masking tape when you go to inspect your plants. If you find bugs or eggs, rip off a 2- or 3-inch piece of tape and wrap it around the infected stem, or press it firmly against the eggs or bugs on the leaves. You can capture dozens of small, newly hatched bugs with each piece of tape. The eggs are easier to remove with this method than you might think, but you do need to hold the leaf with the palm of one hand while pressing the tape with your other hand. Cleanup is a breeze: Fold the bug-filled tape in half and throw it in the trash.
Carol Higgins
Mendon, Michigan
Pragmatic Plant Cleaning
I have a lot of aloe plants. It used to be such a chore to clean off their leaves. I was always accidentally snapping off the delicate limbs when I tried to wipe the leaves with a rag, so I often ended up just using my fingers. Now, I wear a pair of soft cotton gloves and dip my fingers in water before gently rubbing off dirt and sap. This method works great on other house plants too.
Elizabeth Lutz
Wausau, Wisconsin

Gutter Growing
Here’s an easy and efficient way I’ve come up with to grow fresh greens in my small 10-foot-by-12-foot greenhouse. First, make a stand and attach used gutters to the stand. Then, fill the gutters with potting soil and compost. Sow your seeds on top of the soil, and water them well. The greens will emerge quickly and grow amazingly fast. They’re easy to water and harvest. You can mix all your seeds together, or have different cultivars in each gutter. Even though I don’t heat the greenhouse during winter, the greens always last long enough to have a fresh salad for Christmas dinner.
Leslie Witte
Bland, Missouri
Egg Plant
This year, I planted a few seeds in eggshells. I gently poked a hole in both ends of the egg. Then, I made one of the holes into a larger opening. With an enlarged hole, I blew out the contents of the eggshell. Then, I added some soil and a seed. After a week, a healthy seedling appeared. When my outdoor garden is ready to receive plants, I’ll gently create a few cracks around the eggshell and plant the seedling and eggshell in the soil.
Angela Sullivan
Windsor, Ontario
These Sunflowers Are for the Birds
During the winter months, I keep our backyard bird feeder stocked with natural seeds, but all throughout summer, it hangs empty and unused. But then, I decided to plant some sunflowers solely for the birds, and I wondered where I should put them. Since I wanted to keep the birds away from my vegetable patch, I decided to plant the sunflowers by the bird feeder instead.
I live in the high desert, and some of my backyard is covered with small decorative stones rather than vegetation. So, to plant the sunflowers, I had to remove the stones and cut a 12-inch circle in the black landscape fabric around the bird feeder pole. When all of this was removed, I worked compost into the sandy soil.
In late April last year, I planted about a half-dozen sunflower seeds in the circle. I made sure to use seeds from cultivars that would do well in my dry desert climate just north of Albuquerque. The seeds did require daily watering until they were established, and then a full watering can for deep watering once a week. By August, the flowers were in full bloom, and the heads began to steadily droop with the increasing weight of the maturing seeds. I tied the top of the stems to the bird feeder pole when the flowers began to droop.
Then, the birds came. Smaller birds, such as the house finch, would sit on the flowers themselves and eat. As they did so, some seeds would fall below, which the doves quickly found.
With all the activity around the ground in August and September, the sunflowers have successfully reseeded year after year. I do add a 1-inch layer of dry compost each year to nourish the soil. I tremendously enjoy the sunflowers and the birds.
Sharon Moe Furl
Rio Rancho, New Mexico

Modified Mower
I found the mower tip in Country Lore (June/July 2019) interesting and would like to add an alternative purpose for my mower. I’ve been a longtime MOTHER EARTH NEWS reader, and it’s about time I gave something back. I’ve used a wood heater since 1974 to heat our home. But, as time goes on, I’ve found it difficult to manhandle a 32-foot extension ladder to get to the top of the house and clean the chimney. By the way, I was a chimney sweep until 1980. I ordered an August West chimney sweep system advertised in MOTHER EARTH NEWS back then. Anyway, I adapted the lawn mower to carry the ladder for me and help me get on the roof. I also use it for many other chores around the homestead. I thought some of your readers may get a charge out of the pictures. The neighbors think I’m nuts.
Vincent Rawls
Via email
We Pay for Top Tips
Do you have handy home, farm, or garden advice? We pay $25 for each tip we publish, plus another $25 if we use your photos. Send your tips to Letters@MotherEarthNews.com.


