


Whatever your craft — sewing, gardening, woodworking — this is the perfect handy half-apron for all your needs. Make it a tool belt for your domestic-repair needs, a gardening apron when it’s time to plant your bulbs, or a sewing apron for your next project!
Materials
• 1 yard of 44/45-inch fabric (medium- to heavyweight)
• 3 yards of 1/2-inch double-fold bias tape
• 1 spool of coordinating thread
Finished dimensions — 23 inches wide x 10 inches tall
Seam allowance — 1/2 inch unless otherwise specified
Make the Gardening Apron
1. Measure, Mark, and Cut
Place your fabric in a single layer with the wrong side facing up. Measure and mark the following pieces directly on the wrong side of your fabric, and cut them out:
• Tool loop 5-1/2 inches wide x 3 inches tall (cut 4)
• Upper pocket 21 inches wide x 4-1/2 inches tall (cut 1)
• Lower pocket 25 inches wide x 7-1/2 inches tall (cut 1)
• Main apron 21 inches wide x 10 inches tall (cut 2)
NOTE: Place “tall” dimensions along the grainline of your fabric.
2. Make Rounded Corners
On both pockets and main apron pieces, place a standard drinking glass upside down on one bottom corner of each piece and trace the portion of the glass that falls within the seam allowance using a fabric pen. Trim away the excess fabric. Repeat this step in the opposite bottom corner.
(Another approach is to round both corners of one of the pieces and use it as a template to cut the corners on the other pieces.)
3. Assemble the Main Apron
With wrong sides together, place the main apron front and back sections together, matching all raw edges. Baste along all four sides with a 1/4-inch seam allowance.
4. Make and Attach the Upper Pocket
Make a narrow 1/4-inch double-fold hem and topstitch in place along the top edge of the upper pocket piece. With right sides facing up, place the upper pocket on top of the main apron piece, placing the bottom edge of the upper pocket 4 inches up from the bottom of the main apron section, aligning the side raw edges. Stitch the upper pocket in place along the sides and bottom edge, with 1/4-inch seam allowance.
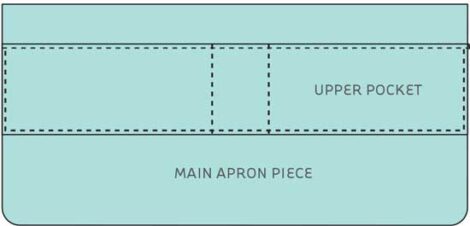
Starting from the left side, measure and mark across the top edge of the upper pocket at 9-1/4 inches and 11-3/4 inches. Mark the same measurements across the bottom edge of the upper pocket. Draw a connecting line between the corresponding marks. Starting at the bottom edge, topstitch along both guidelines.
5. Make Pleats in the Lower Pocket
Make a narrow 1/4-inch double-fold hem along the top edge of the lower pocket piece and topstitch in place. Mark the placement of the two pleats along the bottom edge of the lower pocket at four points: two should each be 7 inches from each side (A) and two points should each be 9 inches from each side (B), as shown. Fold both B points toward the A points to create two pleats facing the outer edges of the lower pocket. Press. Baste across lower edge with a 1/4-inch seam allowance to hold the pleats in place.

6. Attach the Lower Pocket
With right sides facing up, place the lower pocket on top of the main apron piece, aligning bottom edges and rounded corners. Stitch the lower pocket in place along the sides and bottom edge with 1/4-inch seam allowances.
Starting from the left side, measure and mark across the top edge of the upper pocket at 8 inches and 13 inches. Mark the same measurements across the bottom edge of the lower pocket. Draw a connecting line between the corresponding marks. Starting at the bottom edge, topstitch along both guidelines, through all layers.
7. Make and Attach the Tool Loops
Place two tool loop pieces with right sides together and stitch around three sides, leaving one short end open and unfinished. Clip corners diagonally, turn right side out, and press. Edge-stitch around three finished sides. Repeat with the second tool loop.
Position tool loops on opposite sides of the apron, aligning raw edges 4 inches down from the top edge of the apron. Stitch in place with 1/4-inch seam allowance.
Place the finished end of the tool loops 3 inches away from the edge and topstitch in place through all layers. Note that the actual tool loop is longer than 3 inches, but by placing it here, you are creating extra room for your tools.
8. Bind the Apron Edges
Cut a piece of bias tape 45 inches long to bind the sides and lower edge of the apron. Pin bias tape around the side and bottom of the apron and edge-stitch in place, fully encasing the raw edges. (Remember to place the narrower edge on top so that you will catch the back of the bias tape in your stitching.)
9. Make Apron Ties
Use the remainder of the bias tape to bind the top edge of the apron and create the ties. Find the center of the bias tape and position it in the center of the top edge of the apron. Pin the bias tape in place, encasing the entire top edge. Starting at one end of the bias tape, edge-stitch the entire length, across the top of the apron and to the end of the tie. Tie on your apron and fill it up!
Excerpted from One Yard Wonders© Rebecca Yaker. Photographs by © John Gruen. Illustrations by © Missy Shepler/Shepler Studios. Used with permission of Storey Publishing.


