
How to Knit (Storey Publishing, 2014) by Leslie Ann Bestor is the perfect introduction to beginning knitting, whether you are completely new to needle crafts or looking to cross over to a new craft. Bestor explains a few basic techniques in a simple, friendly way that makes learning how to knit easy, from a few all-purpose cast on methods to knit and purl stitches, increasing and decreasing, and binding off at the end. The following excerpt is from Chapter 1, “When You’re Ready to Cast On.”
You need to put stitches on your needles when you’re learning how to knit. This is called casting on, and there are dozens of ways to do it, some that are specific to certain situation, such as making socks or lace items, and some that are more general. I am going to show you a couple of all-purpose cast on methods that will serve you well through your initial forays into beginning knitting. As you progress, you may want to learn others, and I humbly suggest my book Cast On, Bind Off to further your education.
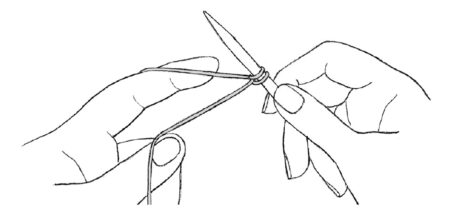
Casting On with a Slip Knot
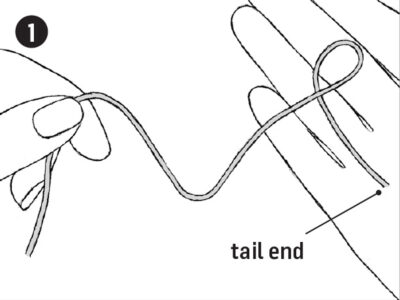
The slip knot creates a loop that can be placed on a needle to begin your cast on. You make it like this:
1. Make a loop of your yarn with the tail end underneath the long end where the yarns overlap.
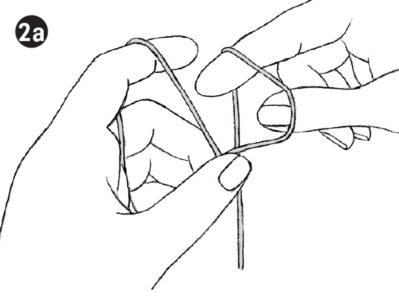
2a. Reach through the loop
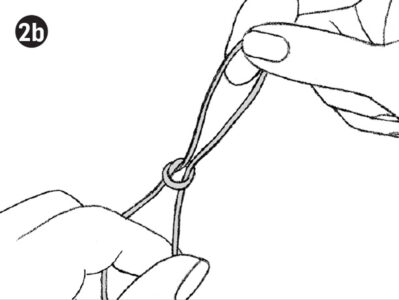
2b. Grab the long yarn, and pull a new loop through the first loop. Place this loop on your needle and pull both ends to tighten.
Knitted Cast On
This cast on method is easy to remember because it is a lot like a regular knit stitch, making it a common cast on when beginning knitting. The edge is fairly firm, though it may stretch out of shape, and it looks good from both sides. This cast on can also be worked in the middle or at the end of a row, when you need to add extra stitches to a work in progress.
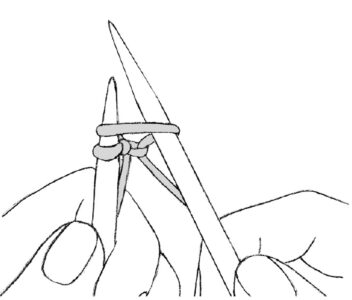
1. Make a slip knot, leaving a 6-inch tail, and place it on the needle.
2. Hold the needle with the slip knot in your left hand and an empty needle in your right hand.
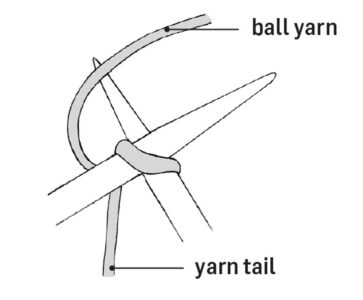
3. Insert the tip of the right hand needle into the left side of the slip knot, going from front to back. Using the strand of yarn attached to the ball, wrap the yarn around the right needle tip, coming first underneath the needles and then over the top to the back. Pull the right tip forward, catching the wrapped yarn, and draw it through the loop on the left needle without letting either stitch drop off the needles.
4. Transfer the new stitch on your right needle to the left needle by twisting the right needle so the two needles are side by side; then insert the left tip into the bottom of the new stitch and slide the right needle out. Be careful to slide the new stitch all the way onto the thick part of the needle before tightening it. If you tighten while it is still on the tip, the new stitch will be too tight, and you will likely curse loudly when you have to work with it on the next row.
Continue in this manner, knitting into the endmost stitch on the left needle and transferring the new stitch back to the left needle until you have the desired number of stitches.
Long-Tail Cast On
This is the workhorse of cast on methods, and many people use it for everything. And, frankly, if you only learn one cast on when you’re learning how to knit, this is the one to know because of its great versatility. That said, learning the long-tail cast on can be a bit tricky because in addition to juggling the needle and the yarn, you need to maintain that darn slingshot position–which I describe below. I know, I know, sometimes you just have to dive into the deep end, so here we go.
Slingshot Position Setup
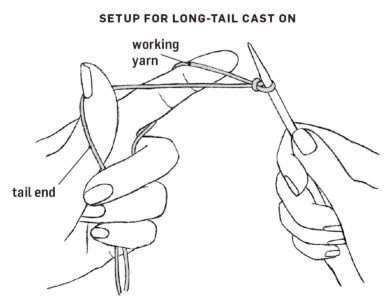
1. Measure out a long tail. To measure the amount needed to cast on 10 stitches, wrap your yarn around the needle 10 times, pull it off, and measure it. That is how much you need for 10 stitches with that particular yarn-and-needle combo. If you want to cast on 20 stitches, double this length; for casting on 30 stitches, triple it, and so on. Then add a few extra inches.
2. Make a slip knot at the point you measured, and put the slip knot on the needle. (You need only one needle for this cast on method.) Hold the needle in your right hand and let the two yarn ends dangle down, with the tail end closest to your body.
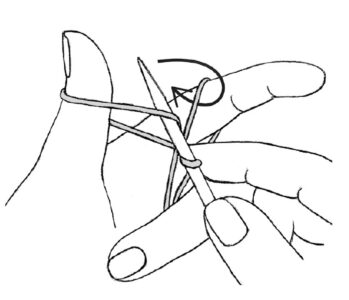
3. Pinch the tips of your left forefinger and thumb together and poke them between the strands of yarn. With the other three fingers of your left hand, grasp the yarn in the palm of your hand. Spread your thumb and forefinger apart, and rotate them back and up so they are pointing to the sky. Looks like a slingshot, right? Okay, now you’re ready for the long-tail cast on.
Cast On
1. Using the needle, reach under and into the loop on the left thumb, then take the tip of the needle under the yarn on your left forefinger from right to left.
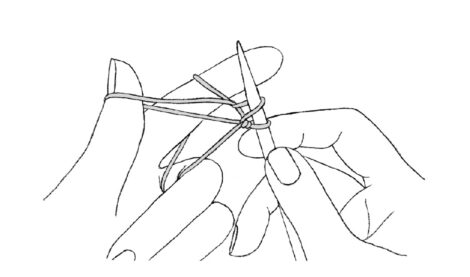
2. Pull up a loop and bring it through the thumb loop.
3. Drop the yarn off your left thumb and gently tighten (not too tight!) the loop on the needle.
Repeat these steps for the desired number of stitches. See, it’s really not that hard, just a bit awkward at first.
Note: Because of how the long-tail cast on forms the stitches, it essentially knits the first row for you. That means the first row you work will be a wrong-side row.
Excerpted from How to Knit © Leslie Ann Bestor, illustrations by © Gayle Isabelle Ford. Used with permission from Storey Publishing.


